Key Takeaways
- Building a yurt is a rewarding DIY woodworking project that combines creativity, craftsmanship, and practical skills.
- Choosing the right wood and taking accurate measurements is essential when you build a yurt.
- DIY yurts allow customization in size, design, and style, making them suitable for gardens, studios, or glamping setups.
- Using proper tools and safety precautions enhances efficiency and reduces risks during construction.
- Well-built yurts are both functional and aesthetically pleasing while supporting sustainable living practices.
Why Build a Yurt
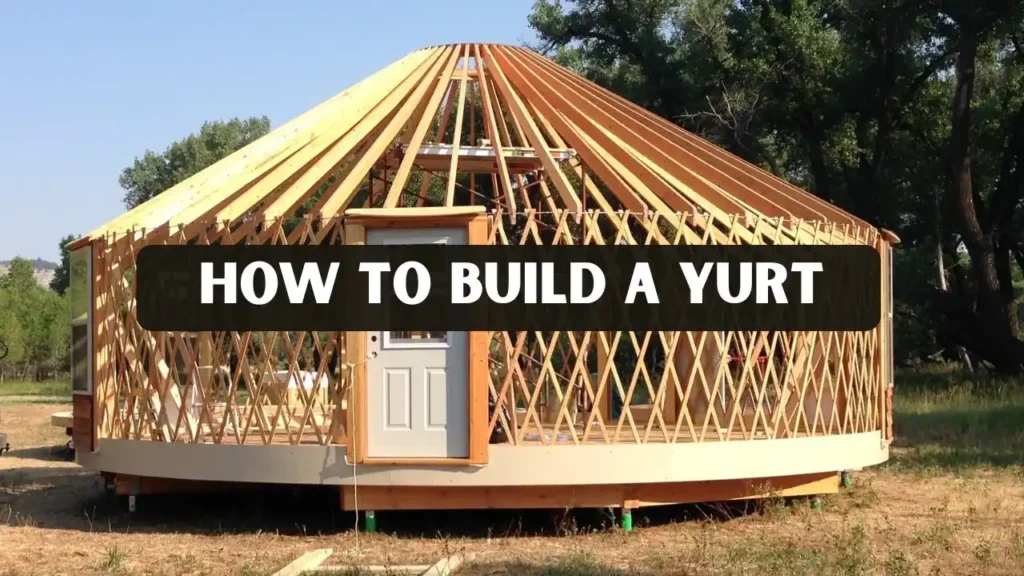
A yurt is a circular, portable structure traditionally used by nomadic communities in Central Asia. In modern times, a popular DIY project for woodworking enthusiasts is to build a yurt, providing a unique outdoor space for meditation, gardening, hobby rooms, or even temporary accommodations.
Unlike conventional sheds, a yurt combines structural ingenuity with aesthetic charm. The circular design distributes weight evenly and allows for efficient use of materials. This guide will walk you through each step of constructing your own yurt, from planning and selecting wood to assembly and finishing touches. By the end, you will have a functional, durable, and visually appealing wooden structure that reflects your woodworking skill and creativity.
History and Significance of Yurts
Yurts have a rich history dating back thousands of years. Originally used by Mongolian nomads, these structures were designed to withstand extreme weather while remaining portable. The traditional yurt consisted of a wooden frame covered with felt or animal hides.
Over time, the design has evolved. Modern wooden yurts incorporate timber lattice walls, roof poles, and waterproof canvas, making them suitable for backyard installations or eco-friendly living. Beyond functionality, yurts carry cultural significance. They represent simplicity, sustainable living, and craftsmanship, which makes build a yurt not only a practical project but also an opportunity to showcase your woodworking skills.
Selecting the Right Wood and Materials
The choice of wood and materials is critical for building a strong and long-lasting yurt.
Types of Wood
- Pine: Lightweight and easy to work with, ideal for lattice walls and roof poles.
- Oak: Strong and durable, excellent for the main structural beams and central crown.
- Cedar: Naturally resistant to moisture and insects, perfect for outdoor environments.
- Spruce or Fir: Cost-effective options for framing that offer sufficient strength
Hardware and Covering Materials
- Screws, bolts, hinges, and tension straps for secure assembly.
- Waterproof canvas or fabric to cover the yurt and protect from weather.
- Optional insulation materials to improve thermal comfort.
- Wood sealant, stain, or varnish to enhance durability and visual appeal.
Selecting the right combination of wood and hardware is essential to ensure that your yurt remains stable, durable, and functional for many years.
Types of Yurts for DIY Projects
Different types of yurts are suitable for varying purposes. Choosing the right type depends on your needs and available space.
- Small Garden Yurts: Compact designs ideal for meditation, yoga, or play areas.
- Medium DIY Yurts: Perfect for backyard studios, hobby rooms, or reading nooks.
- Large Yurts: Suitable for outdoor living spaces or glamping retreats.
- Customizable Modular Yurts: Flexible layouts with windows, doors, and modular interiors.
Understanding the type of yurt you want to build helps in planning materials, space requirements, and construction techniques.
Design Inspirations for Your Yurt
The design of a yurt determines both its aesthetics and functionality. Consider the following inspirations when planning your project:
- Traditional Yurts: Authentic lattice patterns with a central crown.
- Modern Minimalist Designs: Simple lines, smooth finishes, and clean structure.
- Feature-Rich Yurts: Sliding doors, removable panels, and modular interiors
- Eco-Friendly Yurts: Use sustainable materials, energy-efficient designs, and insulation options.
Selecting a design that fits your personal taste while maintaining practicality ensures that your yurt will be both beautiful and functional.
Materials and Tools Needed
Tools Required
- Lathe for shaping roof poles.
- Saw, chisels, clamps, and hammer for cutting and assembling wood.
- Drill and screwdriver for installing hardware.
- Measuring tape, pencil, and square for precision.
Materials Required
- Timber for lattice walls, roof poles, and central crown.
- Screws, bolts, hinges, and tension straps.
- Waterproof canvas or fabric for covering.
- Wood stain, varnish, or sealant.
Having the correct tools and materials is essential for an efficient and safe construction process.
Step by Step Guide to Building a Yurt
Planning and Measurements
- Determine the diameter and height of your yurt based on its intended use. This ensures the structure will be functional and proportionate for your space.
- Sketch the layout, including lattice walls, roof poles, and central crown. A clear plan helps visualize the assembly and prevents measurement errors.
- Decide on decorative features such as carved poles or painted finishes. Adding these details enhances the yurt’s aesthetic appeal and reflects your personal style.
Cutting the Wood
- Measure and mark lattice walls, roof poles, and crown components carefully. Accurate measurements ensure that all pieces fit together properly.
- Use saws and a lathe to achieve precise cuts. Clean and precise cuts improve the structural integrity and overall appearance of the yurt.
- Sand edges and surfaces for a smooth finish. This preparation prevents splinters and creates a professional-looking result.
- Follow safety precautions including gloves, goggles, and masks. Protecting yourself from injuries ensures a safe and efficient woodworking process.
Assembling Lattice Walls
- Connect lattice sections using screws or bolts. This secures the framework and provides a strong foundation for the yurt.
- Form a circular base and ensure even spacing. Proper alignment keeps the structure balanced and stable.
- Verify the structure is level before proceeding to the roof. Checking for level prevents uneven stress and ensures a smooth assembly process.
Constructing the Central Crown
- Shape the crown using strong timber or a lathe for a uniform design. A well-shaped crown ensures stability and enhances the yurt’s overall appearance.
- Drill holes for roof pole connections. Accurate holes make it easier to attach the roof poles securely.
- Temporarily secure the crown to test the alignment of the roof poles. This step helps identify and correct any misalignment before final assembly.
Installing Roof Poles
- Attach roof poles evenly from the lattice top to the crown. Even placement ensures proper weight distribution across the structure.
- Use clamps or supports to maintain angles. This prevents shifting while securing the poles in place.
- Ensure symmetry and balance for structural stability. A balanced roof enhances durability and prevents stress on the yurt’s frame.
Adding the Covering
- Drape waterproof canvas over the frame. This protects the yurt from rain, wind, and other weather conditions
- Secure with straps, hooks, or ties. Proper fastening keeps the covering tight and prevents it from shifting or tearing
- Optional: add insulation for thermal comfort in colder climates. Insulation helps maintain a comfortable temperature inside the yurt year-round.
Finishing Touches
- Attach roof poles evenly from the lattice top to the crown. Even placement ensures proper weight distribution across the structure.
- Use clamps or supports to maintain angles. This prevents shifting while securing the poles in place.
- Ensure symmetry and balance for structural stability. A balanced roof enhances durability and prevents stress on the yurt’s frame.
Maintenance and Care Tips
- Regularly inspect wooden components for moisture damage or insect activity.
- Reapply protective finishes annually to maintain durability and aesthetics.
- Keep canvas clean and dry to prevent mold or deterioration.
- Handle roof poles and lattice carefully during assembly and disassembly.
Proper maintenance ensures that your yurt remains functional, safe, and visually appealing for years.
Conclusion
Build a yurt is an exciting DIY woodworking project that brings together creativity, skill, and practicality. By carefully selecting quality wood and planning each step, you can ensure that your yurt is both strong and durable. Following proper assembly techniques allows the structure to maintain stability and withstand outdoor conditions. Incorporating finishing touches such as stain or sealant enhances both the appearance and longevity of the yurt.
A well-built yurt is versatile and functional, serving as a garden studio, meditation space, or even a glamping retreat. Its circular design provides efficient use of space while adding a unique aesthetic to any outdoor area. Beyond functionality, constructing a yurt is a way to showcase personal craftsmanship and woodworking expertise. With attention to detail and sustainable materials, your DIY yurt becomes a beautiful and practical addition to your property.
FAQs
What is the best wood for building a yurt?
Pine, oak, and cedar are highly recommended depending on strength, durability, and outdoor exposure.
Can beginners build their own yurt?
Yes. Small or medium-sized yurts are achievable with careful planning and basic woodworking skills.
How do I prevent wood from warping?
Avoid prolonged exposure to moisture and sunlight. Apply sealant, stain, or varnish for protection.
How long does it take to build a yurt?
Depending on the size and complexity, construction can take several days to a few weeks.
Is insulation necessary for a wooden yurt?
Optional, but recommended for comfort and energy efficiency in colder climates.


