Adjusting the tailstock on a lathe is an essential component that plays a crucial role in achieving precision and accuracy in your machining projects. Unlike the headstock, which remains stationary, the tailstock is adjustable, allowing you to fine-tune its position for optimal results. In this comprehensive guide, we will walk you through the steps on how to adjust the tailstock on a lathe to ensure your workpieces come out just right.
Understanding the Tailstock
The tailstock is typically composed of two main parts: an upper piece and a lower piece. While the lower piece remains fixed, the upper piece can be moved either forward or backward along rails attached to the lathe’s bed or carriage. This adjustability is what allows you to align the tailstock accurately.
Signs Needs to Adjust Lathe Tailstock
Before we delve into the adjustment process, it’s crucial to recognize when your tailstock requires realignment. Several indicators may signal that your tailstock is out of alignment:
- Inconsistent Tapering: If you notice that your workpieces are unintentionally tapered, it’s a clear sign that your tailstock needs adjustment.
- Vibration and Heavy Use: Excessive vibration or heavy usage can cause the upper piece of the tailstock to move out of alignment over time.
- Off-Center Taper Technique: Sometimes, intentional use of the off-center taper technique can misalign the tailstock significantly.
Materials and Tools You’ll Need for Adjusting the Lathe Tailstock
Before you embark on Adjust the tailstock on a lathe, gather the necessary materials and tools:
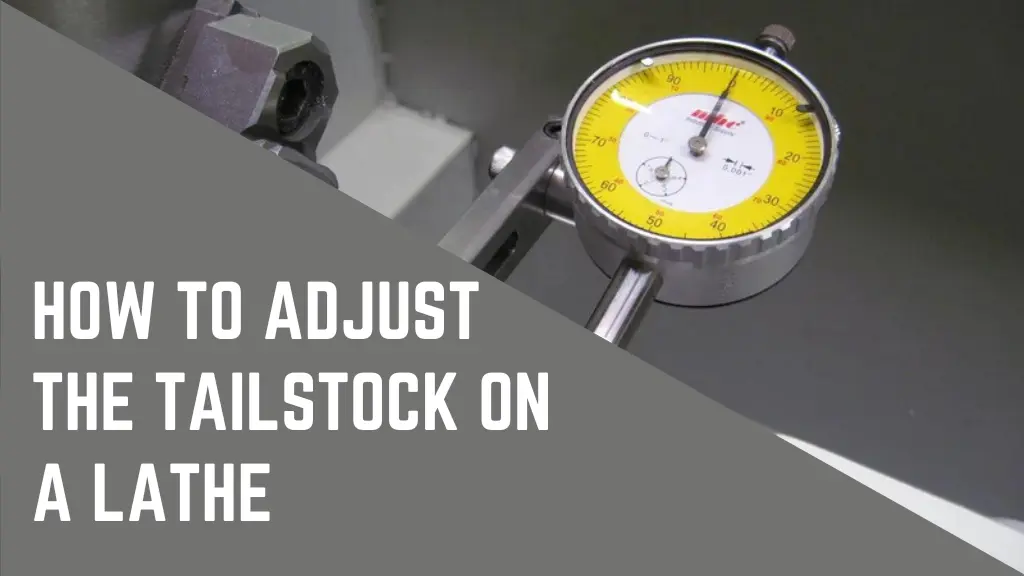
- Dial or Digital Gauge: Essential for precise measurements during the adjustment process. A reliable dial indicator helps detect even the slightest misalignment between the headstock and tailstock.
- Steel Bar: A rigid steel bar of sufficient length, similar to the workpieces you intend to machine.
- Steel Bar (10 mm or 3/8″): This bar will be used to mount your gauge.
- Lathe Dead Center: Ensure it has a morse taper that matches your tailstock.
- Diameter Grub Screw 6 mm (1/4″): Used in tool construction.
- Drill Press: Required for making holes in the steel bars.
- Thread Tap (if necessary): Used to thread the grub screw, only needed if the support rod isn’t welded.
- Welder (if necessary): Required if you opt for a welded gauge support.
Roughly Adjust the tailstock on a lathe by Sight
If your work doesn’t demand extreme precision, you can perform a rough adjustment of the tailstock by sight. Here’s how:
- Loosen the Tailstock Clamp: The first step is to loosen the tailstock clamp, allowing the tailstock to move freely. Make sure the bed is clean and free of debris to prevent misalignment during adjustment.
- Insert Tools into Set Screws: Locate the set screws on either side of the tailstock and insert the appropriate tools (screwdriver, socket wrench, or Allen key) to turn them. Turn the screws gradually and evenly to shift the tailstock precisely without overcorrecting.
- Find the Index Markers: Look for index markers on both the upper and lower pieces of the tailstock. These markers indicate the alignment.
- Align the Pieces: Turn the set screws in opposite directions to adjust the tailstock’s alignment until the index markers align. This visual method provides a rough but serviceable benchmark.
- Tighten the Tailstock Clamp: Once you’ve achieved the desired alignment, tighten the tailstock clamp to secure it in place. Recheck the alignment with the dial indicator to ensure nothing shifted during clamping.
Perfect Adjust the tailstock on a lathe using a Test Bar and Indicator Dial
For precision work, such as achieving accuracy to the nearest thousandth of an inch, it’s advisable to use a test bar and indicator dial. Follow these steps:
- Clean Headstock and Tailstock: Remove all attachments from both the headstock and tailstock. Ensure there are no metal chips or debris inside the bore and quill. Wipe all surfaces clean with a lint-free cloth to prevent contamination or damage during setup.
- Install Good Centers: Install undamaged and accurate centres in both the headstock and tailstock. Suspend the test bar between them. Make sure the test bar is seated firmly and aligned properly to ensure accurate testing.
- Mount a Dial Indicator: Place a dial indicator in the tool rest, ensuring it’s perpendicular to the test bar with the plunger tip at the centre of the test bar. Adjust the indicator height and position to eliminate any angular misalignment for accurate readings.
- Adjust the Tool Rest: Move the tool rest as far left on the carriage as possible. Bring it closer to the test bar, depressing the plunger until the dial reads zero. Double-check that the indicator is stable and perpendicular to the bar to ensure accurate readings.
- Check Alignment: Slide the tool rest along the carriage rails towards the tailstock, monitoring the dial. Any movement indicates misalignment. Park the tool rest at the point of greatest discrepancy.
- Align the Tailstock: Unlock the tailstock and use appropriate tools to move the top of the tailstock toward or away from you until the dial reads zero. Then, lock the tailstock down securely.
- Recheck Alignment: Slide the indicator back and forth along the test bar, watching the dial. Re-adjust the tailstock if necessary until the dial reads zero consistently along the entire length of the test bar. This confirms that your headstock and tailstock are perfectly aligned.
Conclusion
Properly Adjusting the tailstock on a lathe is crucial for achieving precision in your machining projects. Whether you choose the rough alignment by sight or the precise alignment using a test bar and indicator dial, these techniques will ensure that your workpieces come out as intended. Regularly checking and adjusting your tailstock will contribute to the quality and accuracy of your lathe work.
FAQ’s
What is a lathe tailstock used for?
A lathe tailstock is used to support the free end of a workpiece during machining. It helps maintain workpiece stability and enables operations like drilling, centring, and turning on a lathe.
How often should I adjust my lathe tailstock?
The frequency of adjusting your lathe tailstock depends on usage and precision requirements. For precision work, it’s advisable to check and adjust it regularly, while less precise applications may require less frequent adjustments.