Learning how to build a planter box is more than just a simple woodworking project. It combines creativity with practical skills while enhancing your outdoor space. Whether you want to grow herbs on a balcony or add a custom feature to your patio, this project provides hands-on experience with measuring, cutting, and joining materials. Each step helps you build something functional, durable, and visually appealing.
Experts emphasize that careful selection of wood, proper drainage, and protective finishes are essential for a long-lasting planter box. Choosing durable woods like cedar or redwood prevents decay and supports healthy plant growth. Applying sealants or stains protects the wood from moisture and sunlight. Following these professional tips ensures your planter is sturdy and reliable.
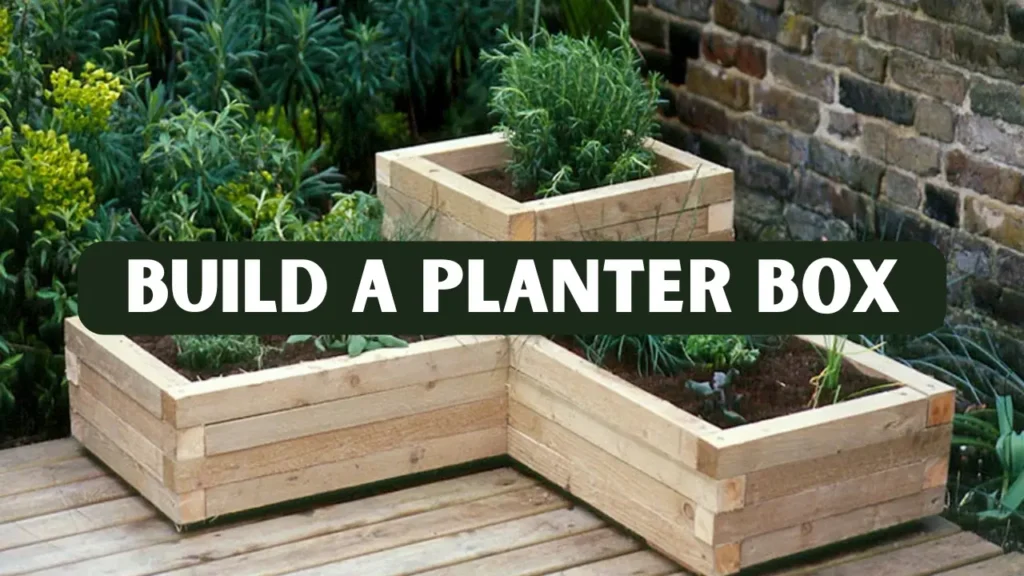
Why You Should Build a Planter Box
A planter box provides a controlled and attractive environment for growing flowers, herbs, or vegetables. Learning to build a planter box yourself allows you to select its size, shape, and wood quality. Unlike store-bought options that often use thin or low-grade materials, a handmade box offers superior durability and design flexibility. This hands-on approach ensures the final product is both functional and visually appealing.
Building a planter box also helps you gain valuable woodworking experience. You develop skills in measuring accurately, cutting precisely, and joining pieces securely. The process is both practical and enjoyable, giving you confidence in your craftsmanship. In the end, you create a custom planter that fits perfectly within your garden or outdoor space.
Choosing the Right Materials
The choice of material has a major impact on the longevity of your planter box. Cedar, redwood, and teak are naturally rot-resistant and ideal for outdoor use, as they can withstand moisture, sunlight, and temperature changes. Using these woods ensures that your planter remains strong and attractive over time. High-quality material provides both durability and aesthetic appeal, making your gardening space look polished.
Pine and fir are more budget-friendly alternatives, but they require proper sealing to resist weather damage and decay. Applying outdoor-grade sealants or stains helps protect these softer woods from moisture, insects, and the effects of UV exposure. Pressure-treated wood should be avoided because chemicals can leach into the soil and affect plant health. Proper preparation ensures your planter lasts for years while keeping plants safe.
Reclaimed wood is a sustainable option that gives your planter a rustic and unique look. Before using it, make sure the wood is clean and free from paint, oil, or other residues that could harm your plants. Board thickness is also important, with three-quarters of an inch recommended for stability and strength. Choosing the right combination of materials ensures your planter is sturdy, functional, and visually appealing.
Essential Tools for the Project
To complete this woodworking project, start by gathering essential tools such as a saw, drill, measuring tape, clamps, screwdriver, and sandpaper. These tools allow you to work with precision and maintain efficiency throughout the assembly process. Wood glue strengthens the joints, ensuring the planter holds together over time. Exterior-grade screws add further stability and durability to the structure.
Having a square on hand is important for keeping corners perfectly aligned. Applying a waterproof sealant protects the planter from moisture, sunlight, and outdoor weather conditions. Proper tool selection and careful use not only make the project easier but also improve the overall quality and lifespan of your planter box. Following these steps ensures a professional and long-lasting result.
Step by Step Process
Start by determining the dimensions of your planter box. A typical herb planter might measure 24 inches long, 12 inches wide, and 10 inches deep, while larger vegetable boxes can range from 36 to 48 inches in length. Accurate measurement is critical, so follow the old woodworking rule of “measure twice, cut once.” Proper planning ensures that your box fits perfectly in the intended space and provides enough room for plant growth. Precision at this stage sets the foundation for a professional-quality result.
Once your boards are cut, sand all rough edges to prevent splinters and improve the finish. Assemble the sides first, applying wood glue at each joint before securing them with screws. Use clamps to hold the boards in place and maintain square corners during assembly. After connecting all four sides, attach the bottom board carefully using pre-drilled holes to avoid splitting the wood. Attention to detail in this step ensures a durable and stable structure.
To complete the build, drill several drainage holes in the bottom to prevent water accumulation. For additional protection, line the inside with breathable landscape fabric to keep soil contained while allowing excess water to escape. Finally, inspect the box to confirm it is level and stable, making small adjustments as needed. Following these steps carefully allows anyone to confidently build a planter box that is both functional and long-lasting.
Case Study The Backyard Herb Planter Project
To illustrate the process, consider a real-world example from a woodworking enthusiast named Sara, who wanted a durable planter box for her backyard herb garden. She used reclaimed cedar boards salvaged from an old fence, sanding and measuring each piece to create a 36-inch-long, 14-inch-wide, and 12-inch-deep box. Sara applied waterproof wood glue and galvanized screws during assembly to ensure weather resistance. She also lined the interior with breathable fabric to prevent soil erosion and finished the box with two coats of natural oil, giving it a warm, golden tone.
Over the next six months, Sara’s planter endured heavy rain and direct sunlight without warping. The herbs thrived, and she later built two additional boxes using the same design. Her total cost was less than half that of buying similar store-bought planters, demonstrating that taking the time to build a plant box can save money while ensuring quality. This case study emphasizes the importance of material selection, precise construction, and proper finishing for long-lasting results.
Finishing and Protection
A planter box is exposed to the elements, so applying a proper finish is crucial for longevity. Choose an exterior-grade sealant, varnish, or oil that matches your wood type, and apply two to three coats for adequate protection. Allow each coat to dry completely before adding the next to ensure even coverage. Proper finishing helps maintain the wood’s natural beauty while shielding it from moisture and sunlight.
If you want to add color, exterior paint or tinted wood stain can provide vibrancy while complementing your garden or patio design. Always select finishes that are safe for plants to prevent contamination of soil or roots. Finishing your planter not only improves its visual appeal but also significantly extends its lifespan, ensuring it remains functional and attractive for years.
Design Variations and Personalization
The classic rectangular planter box is just the starting point for creative woodworking. Many builders create tiered planters for vertical gardens or square boxes that fit neatly into corners. Some designs include trellises to support climbing plants, while others add legs for elevation and easier maintenance. These variations allow gardeners to optimize space and create visually appealing arrangements.
Creative woodworkers sometimes combine functionality with design by building benches that incorporate planters, offering both seating and greenery. Modular boxes are another option, allowing multiple units to fit together and cover larger garden areas. This versatility in design ensures that you can adapt your planter boxes to any outdoor space or personal aesthetic preference.
Common Mistakes to Avoid
Beginners often underestimate the importance of proper drainage in a planter box. Without enough holes, water can accumulate, damaging both the wood and plant roots. Skipping sanding or sealing also leads to premature wear and reduces the planter’s lifespan. Using nails instead of screws may create weaker joints that can loosen over time, affecting overall stability.
It is important to avoid overfilling the planter with heavy soil until you confirm the structure is strong enough. If you plan to move the box frequently, consider adding handles or wheels to reduce strain and prevent damage. Paying attention to these small details ensures that the finished planter is both durable and visually appealing, providing a long-lasting addition to your garden.
Maintenance and Seasonal Care
Check your planter box regularly for maintenance by tightening any loose screws and reapplying sealant if water no longer beads on the surface. Cleaning the interior and refreshing the soil annually helps maintain plant health and ensures optimal growth. Regular upkeep also preserves the wood and keeps the planter looking attractive over time.
In regions with freezing temperatures, it is best to empty the planter and store it indoors during winter. Freezing moisture can expand and crack the wood, causing long-term damage. For permanent outdoor setups, raising the planter slightly off the ground with bricks or small wooden feet prevents water from pooling underneath. These small steps extend the lifespan of your planter box significantly.
Why This Project Builds Skill and Confidence
Constructing a planter box teaches several foundational woodworking techniques. You develop skills in measuring accurately, cutting precisely, and keeping corners square. The project also highlights how design choices affect durability and how exposure to weather impacts the materials. Practicing these basics builds confidence for both simple and complex projects.
As your skills improve, you can experiment with advanced joinery or incorporate other materials such as metal or stone. Each planter box you build enhances precision and encourages creative problem-solving. Over time, this experience prepares you for larger, more intricate woodworking projects while producing functional and aesthetically pleasing results.
Safety First
Proper safety practices are essential for protecting both yourself and your work while building a planter box. Always wear safety goggles when cutting or drilling, gloves when handling rough boards, and a dust mask while sanding. Keeping your workspace organized and free from distractions helps prevent accidents and ensures more precise results. Following these precautions sets a solid foundation for safe and effective woodworking.
If you are new to woodworking, take your time and proceed step by step. A steady, methodical approach improves accuracy and reduces errors during assembly. Learning to work carefully builds confidence, allowing beginners to complete projects successfully while developing essential skills for future woodworking endeavors.
Real-World Applications and Aesthetic Benefits
Handcrafted planter boxes are not limited to personal gardens. Restaurants, cafés, and hotels often use custom wooden planters to enhance outdoor décor and create inviting spaces. Designers and builders also favor handmade boxes for eco-friendly landscaping projects. The versatility of wooden planters makes them suitable for both commercial and residential environments.
A wooden planter adds warmth to modern spaces, especially when paired with stone or metal furnishings. Its natural texture softens sharp architectural lines, creating a harmonious balance between structure and nature. These planters can also serve as thoughtful gifts or become product offerings for small woodworking businesses, combining aesthetics with functionality.
Conclusion
When you build a planter box, you experience the essence of woodworking. The project combines design, precision, and careful execution into an object that supports living plants. Every step, from selecting the right wood to finishing the surface, reflects thoughtful craftsmanship and attention to detail. This hands-on process allows you to create a piece that is both functional and visually appealing.
Your completed planter will not only enhance your space but also demonstrate your skill and creativity. As seen in Sara’s project, a well-constructed planter can endure outdoor conditions for years. The success of one project can inspire confidence and encourage more ambitious woodworking endeavors in the future.
Frequently Asked Questions
How long does it take to build a planter?
For most beginners, it takes four to six hours, including cutting, assembly, and finishing. Complex designs may take longer due to drying times for sealant or paint.
What is the best wood for outdoor planter boxes?
Cedar and redwood are preferred for their natural resistance to decay and insects. Pine and fir are suitable alternatives if properly sealed.
Should I line the inside of my planter box?
Yes. Lining protects the wood from moisture and prolongs its life. Landscape fabric or plastic liners with drainage holes are effective.
How can I ensure proper drainage?
Drill several evenly spaced holes in the bottom board. Place small stones or gravel above the holes to improve water flow and prevent soil from clogging them.
Can I build a planter box using only hand tools?
Yes. Hand saws, screwdrivers, and hammers are sufficient for basic designs. Power tools simply speed up the process and produce cleaner cuts.


