Creating an outdoor kitchen is an exciting way to turn your backyard into a stylish and functional gathering space. It’s perfect for hosting family dinners, summer barbecues, or weekend get-togethers with friends. A well-designed setup adds convenience, enhances outdoor living, and increases your property’s value. With the right planning and creativity, you can build an outdoor kitchen that becomes the heart of your home’s outdoor experience.
A wood-framed outdoor kitchen offers durability, natural beauty, and countless customization possibilities. You can tailor it to match your home’s design while ensuring it withstands various weather conditions. This comprehensive guide walks you through every stage, from planning and choosing materials to construction and maintenance. It’s ideal for DIY enthusiasts and homeowners aiming for a high-quality, long-lasting backyard cooking area.
Key Takeaways
- Building an outdoor kitchen enhances your backyard’s functionality and entertainment value.
- A wood frame offers durability and flexibility to build an outdoor kitchen.
- Proper planning, material selection, and step-by-step execution are essential for a successful outdoor kitchen.
- This guide includes tips, real-world examples, and FAQs to help you create a professional-quality outdoor kitchen.
Why Create an Outdoor Kitchen?
Benefits of an Outdoor Kitchen
- Enhanced Entertainment Space: Host gatherings outdoors without feeling cramped inside your home. Adding seating and a prep area creates a true social hub for friends and family.
- Increased Home Value: Adds functional living space and improves property appeal. Potential buyers often view outdoor kitchens as premium amenities.
- Convenience: Cook, serve, and clean outdoors without constant trips to the indoor kitchen. Integrating sinks and prep areas reduces workflow interruptions.
- Customization: Wood frame kitchens can be tailored to your backyard layout, appliances, and design preferences. You can choose the shape, countertop style, and storage options to suit your lifestyle.
- Durability: With proper material selection and finishing, wood-frame kitchens can last for years. Selecting weather-resistant wood and hardware ensures longevity.
Planning Considerations
- Space & Layout: Measure your backyard and determine the kitchen’s footprint. Consider traffic flow and accessibility to make the area practical and safe.
- Appliances & Features: Decide on grills, sinks, refrigerators, storage cabinets, and work surfaces. Including zones for prep, cooking, and cleaning enhances functionality.
- Budget: Include materials, tools, appliances, and finishing touches to avoid overspending. Planning for contingencies prevents delays and ensures completion.
- Permits & Regulations: Check local building codes for outdoor structures, plumbing, and electrical work to ensure compliance. Knowing regulations upfront prevents fines and reconstruction.
Materials and Tools You’ll Need
Wood Materials
- Pressure-Treated Lumber: Resistant to rot, decay, and insects; affordable and widely available. Ideal for base framing and vertical supports.
- Cedar: Naturally resistant to moisture and insects, with a warm color and smooth texture. Adds aesthetic value to visible surfaces.
- Redwood: Highly durable with excellent weather resistance; more expensive but long-lasting. Perfect for countertops, trims, and decorative panels.
Countertops and Surfaces
- Concrete or granite countertops provide durability and heat resistance. Ideal for heavy-duty use and heat-prone areas.
- Treated wood or tile countertops create a custom aesthetic. Can be sealed for water resistance and ease of cleaning.
- Surfaces should be easy to clean and maintain. Non-porous finishes prevent staining and bacterial buildup.
Fasteners and Hardware
- Galvanized screws, nails, brackets, and anchors for long-lasting stability. Stainless steel alternatives resist rust.
- Brackets reinforce corners and vertical supports. Ensures that the kitchen can support appliances and heavy countertops safely.
Essential Tools
- Circular saw, drill, measuring tape, level, sander, and protective gear such as gloves and safety glasses.
- Optional tools include clamps, jigs, and paintbrushes for precise assembly and finishing. Power sanders and jigs make repetitive cuts faster and more accurate.
Step-by-Step Guide: How to Build an Outdoor Kitchen with Wood Frame
Step 1: Lay the Foundation
Select a level area and clear debris. Use concrete slabs, pavers, or compacted gravel as the base. Ensure the foundation is sturdy and slightly elevated to prevent water accumulation.
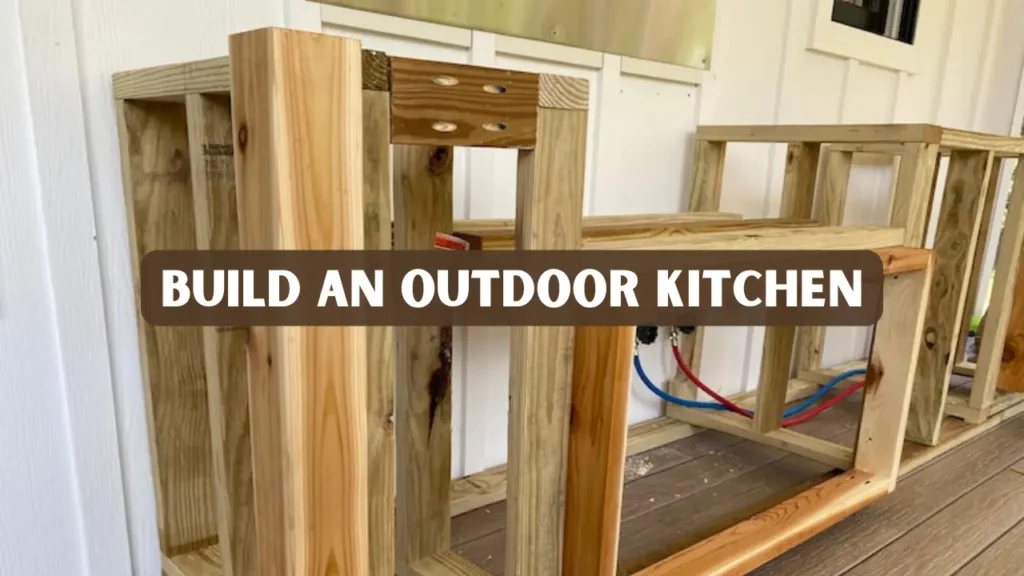
Step 2: Build the Wood Frame
Cut wood pieces to required dimensions using a circular saw. Assemble the base frame with galvanized screws and brackets, ensuring corners are square. Add vertical supports to maintain structural integrity. Use a level frequently to ensure the frame is perfectly straight and even.
Step 3: Install Countertops and Cabinets
Attach outdoor-grade countertops to the wood frame using appropriate screws and supports. Install cabinets or shelving for storage of utensils and cookware. Ensure all surfaces are level and firmly anchored. Consider moisture-resistant finishes for cabinets to extend their lifespan.
Step 4: Add Appliances and Fixtures
Install a grill, sink, and refrigerator according to the manufacturers’ instructions. Connect utilities, including water, gas, and electricity, following local safety regulations. Install protective elements such as heat shields or splash guards to ensure safety and longevity of the structure.
Step 5: Finish and Protect the Wood Frame
Sand all wood surfaces to remove rough edges and splinters. Apply a protective exterior sealant or paint to resist moisture, sun damage, and pests. Adding a pergola, canopy, or roof can further protect your outdoor kitchen and provide shade.
Real-World Example
- A DIY enthusiast in Denver decided to build an outdoor kitchen using cedar and pressure-treated lumber, creating an L-shaped design with a built-in grill, sink, and storage. Proper planning and protective finishing allowed it to remain durable and visually appealing for over five years.
- In Austin, a homeowner built a backyard outdoor kitchen using redwood and concrete countertops, including a small pizza oven and bar area. Regular maintenance and weatherproof finishes have kept the kitchen functional and attractive for more than four years.
Maintenance Tips for Longevity
- Clean countertops and cabinets regularly to prevent dirt and mildew buildup. Wipe down surfaces with a mild detergent and water solution to remove grease and stains.
- Inspect screws, joints, and wood surfaces periodically for damage or rot. Tighten loose screws and replace any damaged wood immediately to maintain structural integrity.
- Reapply sealant or exterior paint every 1–2 years. This helps protect the wood from moisture and UV damage, keeping your kitchen looking fresh and durable.
- Cover appliances and surfaces during extreme weather to extend their lifespan. Use waterproof covers or tarps to prevent rust, warping, and discoloration.
- Regular maintenance ensures safety, aesthetics, and functionality. Consistent care can also prevent costly repairs and extend the overall life of your outdoor kitchen.
Common Mistakes to Avoid When Building an Outdoor Kitchen
- Ignoring ventilation: Poor airflow can cause smoke buildup and overheating of appliances. Always include vents or open spaces around cooking areas to ensure proper air circulation.
- Skipping waterproofing: Without proper sealing, moisture can damage wood and metal components. Apply high-quality sealants and use weather-resistant materials to keep your kitchen safe year-round.
- Poor layout planning: Ensure clear pathways and safe spacing between the grill, sink, and seating area. A functional layout improves safety and allows multiple people to use the space comfortably.
- Choosing the wrong materials: Avoid untreated wood or low-quality stone that can crack or rot outdoors. Select durable materials like stainless steel, granite, or pressure-treated lumber for long-term reliability.
- Not setting a realistic budget: Plan for material costs, labor, and unexpected expenses to avoid project delays. Creating a detailed budget early helps you prioritize essentials without overspending.
Conclusion
Building an outdoor kitchen with a wood frame is a rewarding project that enhances your backyard’s functionality, entertainment value, and overall appeal. It creates a perfect space for cooking, dining, and socializing while seamlessly blending with your outdoor surroundings. A well-planned design can turn even a small yard into a cozy and efficient cooking zone that complements your home’s architecture.
FAQs
What is the cost of building a wood-frame outdoor kitchen?
Costs vary depending on materials, appliances, and finishes. A basic DIY setup may cost around $1,500, while custom projects can exceed $10,000.
Can I build an outdoor kitchen on my own?
Yes, with proper planning, tools, and safety precautions, a DIY enthusiast can successfully build a wood-frame outdoor kitchen.
Which wood is best for an outdoor kitchen frame?
Pressure-treated lumber, cedar, or redwood are ideal choices due to their resistance to moisture and decay.
How do I protect my outdoor kitchen from weather damage?
Apply sealants, exterior-grade paints, and consider covers such as pergolas, canopies, or tarps to protect the structure from rain and sun.
Are permits required for building an outdoor kitchen?
Check your local building codes for structures, plumbing, and electrical installations. Permits may be required depending on the complexity of your project.


