Key Takeaways
- The Cabriole leg is a signature element of 18th-century furniture, recognized for its elegant S-curve.
- It originated in France and became iconic in Queen Anne and Chippendale furniture styles.
- Crafting this type of leg requires shaping, carving, and detailed finishing for symmetry and strength.
- Various foot styles, including ball-and-claw and pad feet, influence the leg’s overall character.
- With proper materials and tools, woodworkers can create furniture that balances form and function.
Why the Cabriole Leg Design Stands Out
Historical Significance
The name “cabriole” originates from the French word meaning “to leap like a goat,” symbolizing the leg’s flowing and natural motion. First appearing in the early 18th century, it became a defining element in the elegant styles of Louis XV, Queen Anne, and Chippendale furniture. Its distinct curve captured the essence of movement and grace, making it a hallmark of refined design.
This innovative form marked a departure from the rigid, architectural furniture of earlier centuries. Designers began embracing organic shapes inspired by nature, with gentle curves resembling animal limbs. The design ushered in a new era of aesthetics, combining beauty with balance, strength, and artistic sophistication.
Understanding the Structure and Form
Key Parts:
Popular Foot Styles:
- Ball-and-Claw: A bold design featuring a claw gripping a ball, common in Chippendale pieces. It symbolizes strength and artistry, often chosen for furniture meant to convey luxury and power.
- Pad Foot: A simpler, round base typical of Queen Anne furniture. This style provides stability while maintaining a soft, understated appearance suitable for both classic and contemporary pieces.
- Slipper Foot: Smooth, tapered, and elegant; ideal for lighter furniture. It gives a refined visual lift, enhancing the overall balance and sophistication of delicate tables and chairs.
Materials and Tools
Recommended Woods:
- Maple: Smooth grain and ideal for intricate detailing.
- Oak: Strong and traditional for heavy furniture.
- Cherry: Ages beautifully with rich color tones.
- Walnut: Luxurious and perfect for carving precision.
Essential Tools:
- Lathe: To turn the upper sections.
- Bandsaw: To cut out the curved profile.
- Carving Gouges & Chisels: For shaping contours and foot details.
- Rasps & Files: To smooth transitions and refine curves.
- Sandpaper: For final surface polishing.
High-quality tools help ensure clean cuts, accurate proportions, and a professional finish.
Step by Step Crafting Process
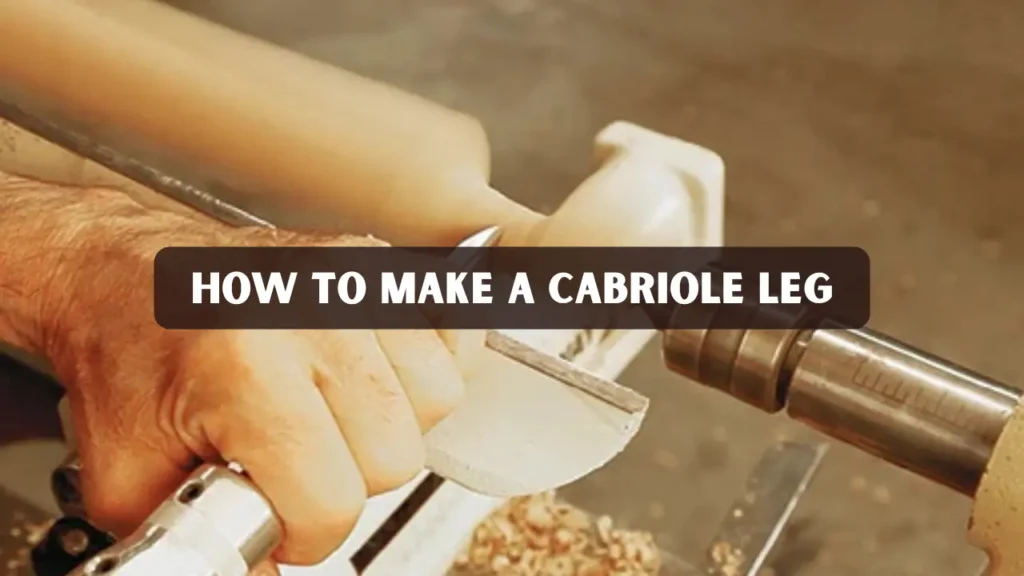
1. Lathe Turning Method
- Start with a squared wood blank. This ensures stability and precision when marking and cutting the leg’s profile.
- Rough-turn the leg to define the general curvature. Focus on shaping the basic S-curve while keeping enough material for detailed carving later.
- Refine the knee and ankle using detailed chiseling. Work slowly to create smooth transitions and maintain consistent symmetry on both sides.
- Smooth with fine-grit sandpaper for a polished appearance. Gradually increase grit levels to achieve a flawless finish that highlights the wood grain.
2. Bandsaw and Hand Tool Method
3. Carving and Joinery Method
Finishing Techniques
Proper finishing ensures that every curve, joint, and contour reflects professional craftsmanship.
Common Mistakes and How to Avoid Them
Practical Applications
Modern Interpretations and Design Trends
Today’s designers combine the Cabriole leg with modern materials such as glass or metal, creating a contemporary twist on a classical form. CNC machines now replicate the traditional S-curve with accuracy and speed, making it accessible for large-scale production.
The design’s enduring appeal lies in its harmony of geometry and grace, proving that true craftsmanship transcends time.
Expert Tips
- Use Templates: Always design on paper or MDF first to maintain symmetry.
- Study Antique Models: Observe historical furniture to understand authentic proportions.
- Work Slowly: Precision matters more than speed during shaping.
- Test Fit: Assemble legs with mock joints before final attachment.
- Protect the Finish: Apply felt pads or protective tips to preserve both leg and flooring.
Case Studies
- A woodworking student at a local craft academy successfully recreated an 18th-century Queen Anne table using cabriole foot carved from maple. The project enhanced her accuracy with shaping tools and showcased how historical design principles still guide modern craftsmanship.
- A professional furniture restorer in North Carolina restored a damaged Chippendale chair by replacing its leg with a hand-carved walnut replica. The restoration preserved both structural integrity and aesthetic authenticity, earning praise from antique collectors for historical precision.
Conclusion
The Cabriole leg represents a perfect blend of craftsmanship, artistry, and history. From its origins in European royal furniture to its role in modern design, it remains a timeless symbol of refined woodworking. Mastering its form requires patience, precision, and respect for tradition skills every serious craftsman can take pride in developing.
Whether you’re creating a reproduction or a new design, learning the art of the cabriole foot ensures your furniture stands as a lasting piece of elegance.
FAQs
What is a cabriole leg?
A cabriole is a furniture leg featuring a double curve resembling an animal’s leg, used in many antique and modern designs.
Hardwoods like maple, oak, walnut, and cherry offer strength, detail, and durability.
Can beginners make cabriole foot?
Yes, starting with a pad foot design and a pre-drawn template helps beginners achieve consistent results.
How long does crafting one leg take?
Depending on complexity, each leg can take several hours to a full day.
Hand-rubbed oil finishes and clear lacquer both enhance wood grain while protecting the surface.


