Learning how to make table legs on a wood lathe is one of the most rewarding skills a woodworker can master. Table legs are more than simple supports; they shape the style, stability, and personality of your furniture. Thick turned legs can make a dining table look bold and traditional, while slimmer, tapered designs bring out a modern aesthetic.
This guide walks you through every step of the process, from selecting the right wood to planning, shaping, sanding, and finishing your table legs. Along the way, you will find professional insights, real-world examples, and tips to help you avoid common mistakes. The goal is to give you the confidence to craft legs that complement any tabletop, enhance durability, and reflect your personal craftsmanship.
Why Table Legs Are Important in Furniture Design
Table legs have a bigger influence on furniture than many people realize. They determine how stable a table feels, how much weight it can support, and what kind of aesthetic impression it creates in a room. A table with sturdy, thick legs tends to look bold and grounded, while one with slim, tapered legs feels lighter and more delicate. Traditional homes often favor carved or turned legs with intricate detailing, while modern interiors lean toward clean lines and minimal shapes.
Beyond looks, the legs also dictate function. A heavy hardwood dining table requires strong, thick legs to support the load, while a small coffee table can sit comfortably on narrower legs. Understanding these differences will help you plan and build legs that both look appropriate and perform reliably.
Tools and Materials You Need
To begin, you need to gather the right tools and materials. While it is possible to make table legs with only basic hand tools, having access to machines such as a table saw, band saw, or lathe will greatly expand your options. A saw is essential for cutting the blanks, while a lathe allows you to create elegant turned designs. Chisels and gouges help refine details, and a hand plane or sander ensures smooth, even surfaces. You will also need a drill for joinery work, a reliable measuring tape, and strong clamps for holding pieces together during assembly.
When it comes to materials, most woodworkers choose between hardwoods and softwoods. Hardwoods like oak, maple, and walnut are strong, durable, and visually striking, which makes them ideal for formal dining tables or pieces that will see heavy use. Softwoods such as pine or cedar are easier to shape and more affordable, which makes them great for beginner projects or rustic farmhouse-style tables. Whatever wood you select, make sure it is kiln-dried to avoid warping or splitting later.
Choosing the Best Wood for Table Legs
The type of wood you select affects both the appearance and durability of your finished project. Hardwoods such as maple, oak, and walnut produce legs that are exceptionally strong and resistant to everyday wear and tear. They also have distinct grain patterns that enhance the final appearance once finished with oil or stain. Softer woods like pine and cedar are less dense, so they are easier to cut and shape, but they may dent more easily under heavy use.
In addition to the wood type, grain direction is important. Straight-grained wood is easier to work with and less likely to split when cutting or shaping. Boards with knots or irregularities should be avoided for legs, as these can compromise structural strength. If you are learning how to make table legs, selecting the right type of wood with clean grain is one of the most important steps. Choosing carefully at this stage ensures your finished table legs will last for years.
Step by Step Process How to Make Table Legs
Planning Your Design
Before making cuts, take time to plan. Think about the style of table you want to build and sketch out the design. Dining tables generally require legs around 28 to 30 inches tall, while coffee tables are closer to 16 to 18 inches. Consider proportions: a wide tabletop will look awkward with very thin legs, while a small side table may appear clunky if the legs are too thick. Planning ahead helps you avoid wasting wood and ensures the legs fit the overall aesthetic.
Cutting the Blanks
Once your design is finalized, cut your wood into rectangular blanks. These blanks should be slightly larger than your intended final dimensions. The extra size gives you room to shape and smooth the wood without ending up with undersized legs. Cutting accurately at this stage sets the foundation for all the shaping that follows.
Shaping the Legs
There are several approaches to shaping table legs, and the choice depends on the design you want to achieve. For straight or tapered legs, start by marking taper lines with a pencil and straightedge to guide your cuts. Use a saw to follow these lines carefully, and then refine the edges with a plane or sander until the surface is smooth. This method works best for modern or minimalist tables where simplicity and clean lines are the focus.
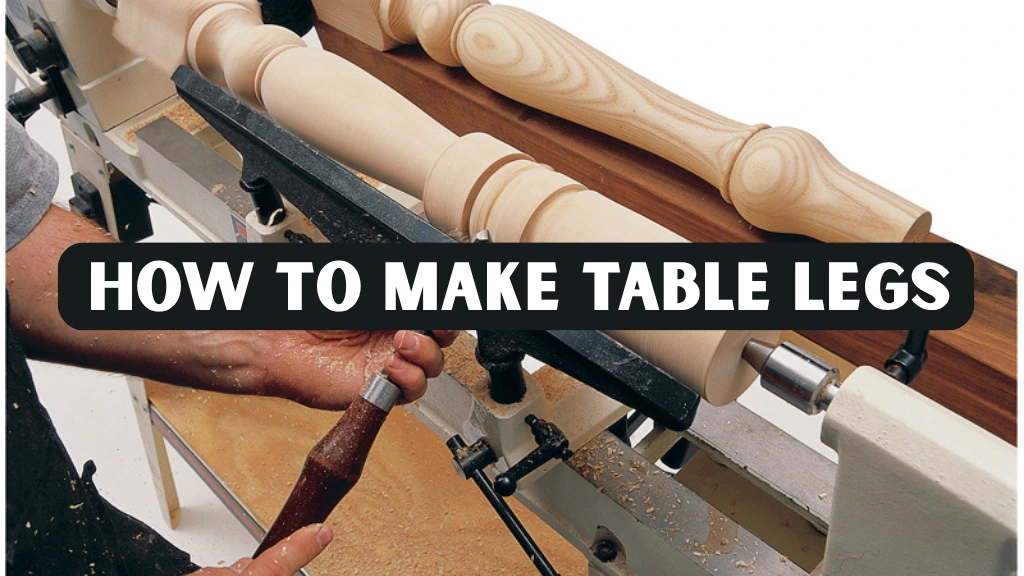
For a more decorative look, turning or carving methods offer greater design flexibility. On a lathe, a roughing gouge can first round the blank, while chisels and parting tools help form curves, beads, or elegant details. Turned legs often complement traditional or farmhouse-style tables, adding character and charm. Carved legs, on the other hand, start with a sketched design and require chisels to remove wood gradually, giving you endless opportunities for creativity.
Sanding
After shaping, sanding is essential. Begin with a coarse grit like 80 to remove rough tool marks, then move through progressively finer grits up to 220 or higher. Smooth surfaces not only look better but also accept finishes more evenly. Sanding also softens sharp edges, which improves comfort and prevents splinters.
Assembly
Attaching the legs to the tabletop requires strong joinery. Traditional mortise and tenon joints are among the most reliable, creating a mechanical bond between the leg and apron. For simpler builds, dowels provide alignment and strength when paired with wood glue. Metal brackets or leg mounting plates are another option, especially for beginners who want quicker assembly. Whatever method you choose, make sure the legs are square and even so the table sits flat.
Finishing
The final stage is applying a finish. This can be stained to enhance color, oil to highlight natural grain, or polyurethane for durability. Each type of finish affects the look and feel of the wood differently. Apply multiple thin coats, sanding lightly between them, to achieve a smooth, professional result. The finishing stage determines how the legs will appear in the room and how well they resist daily wear.
Styles of Table Legs
When deciding how to make table legs, style is just as important as function. Farmhouse tables often use thick, turned legs with distressed or painted finishes. Mid-century modern tables typically feature slim, tapered legs made from walnut or oak. Industrial-style furniture might combine wooden legs with metal accents for a rugged look. Traditional styles rely on detailed carving, fluting, or ornate profiles. Each approach communicates something different, and your choice should align with the table’s purpose and the surrounding décor.
Tips from Experienced Woodworkers
Professional woodworkers often stress the importance of precision. Measuring carefully before every cut saves time and materials. Many also recommend practicing on scrap wood, particularly if you are using a lathe for the first time. Keeping tools sharp is another universal tip, as dull blades leave rough surfaces that require extra sanding. Templates can also be useful for ensuring that all four legs match in shape and size. Finally, finishing should not be rushed; multiple thin coats produce a much better result than a single heavy application.
Common Mistakes to Avoid
Beginners sometimes make the mistake of using wood that has not been properly dried, leading to warped legs over time. Another common error is cutting legs too thin for the size of the tabletop, which can make the table unstable. Uneven lengths are also a problem; even a small difference can cause wobbling. Skipping or rushing through sanding and finishing often leads to rough, unattractive results that diminish the quality of the entire piece. By anticipating these issues, you can avoid frustration and achieve a professional outcome.
Real-World Example
One craftsman shared his experience of making maple legs for a large farmhouse dining table. His challenge was ensuring that all four legs matched in shape and dimension. To solve this, he used a lathe with calipers and a template to check measurements frequently. The process required patience, but the result was a beautifully consistent set of legs that gave the table a balanced and cohesive look. Stories like this highlight the importance of precision and persistence when learning how to make table legs.
Conclusion
Knowing how to make table legs is a skill that blends practicality with creativity. By carefully choosing the right wood, planning your design, shaping with precision, and finishing thoughtfully, you can create legs that are both durable and beautiful. Every step, from cutting blanks to applying the final coat of finish, contributes to the strength and appearance of the finished table.
With patience and attention to detail, even beginners can produce legs that enhance their projects. Whether you prefer simple tapered legs or intricate turned designs, the ability to make your own table legs gives you complete control over style and quality. In woodworking, legs may be the foundation of a table, but they are also the foundation of good craftsmanship.
FAQs
How do I make table legs without a lathe?
You can cut and shape straight or tapered legs using a saw, plane, and sander. Templates help ensure uniformity.
What is the standard height for table legs?
Dining table legs are generally 28 to 30 inches tall, while coffee tables are closer to 16 to 18 inches.
Which wood is best for making table legs?
Hardwoods like oak, maple, and walnut provide strength and a refined look, while pine is more affordable and easier for beginners.
How do I attach table legs securely?
Mortise and tenon joints are the strongest, while dowels and brackets are practical options for simpler builds.
Can I refinish old table legs?
Yes, you can sand down old legs and apply a new stain or paint to match a different tabletop or refresh the furniture.


