We will guide how to Tapering a dowel without a lathe. Our expert do-it-yourself guide describes everything from selecting the right dowel to achieving a polished finish. Perfect your woodworking skills today.
Understanding Tapering Dowel
Tapering a dowel without a lathe seems like an unsettling task, but if you use the right steps, techniques, and tools in this method, it’s mostly achievable. Whether you’re a woodworking enthusiast or tackling a do-it-yourself project, this guide will explain to you all of these easy steps to create tapered dowels with precision and finesse.
Tools and Materials
Before getting all the information for using the process, let’s collect the main tools and materials which you’ll need for this do-it-yourself project.
- A dowel collection for this project of your desired length and diameter, which you will need.
- A Marking tool or any type of pencil.
- A saw of a different type (hand saw, coping saw, or jigsaw).
- We will use a Sanding block (various grits) or sandpaper.
- Hold the Clamps tool or a vice.
- File or wood rasp blade.
- Eye safety goggles and a dust mask for safety
Selecting the Right Dowel
- Choose Your Project Needs: Start the project by assessing all your requirements, including the desired length of the dowel, diameter, and wood type for the dowel. You will ensure that all the chosen dowel tools align with these specifications.
- Ensure Straightness: Check the dowel for different types of signs of warping on the dowel or bending. The straightness of a dowel is very crucial for achieving a great, accurate taper.
- Check for Problems: You must carefully check the dowel for all steps you have done in the project, knots, cracks, or other defects that may create the problem for your tapering process. A smooth, problem-free surface is a great thing for you.
Marking Point on the Taper
- Planning and Measurement: Use the length of the taper that you want to use over the dowel for this process. Measure and mark the point on this area using on which you are using a pencil or marking tool.
- Accurate Precision is Key: You must check that you accurately mark the area, as it will show as your defining guide overall for making this tapering process. Accurately marking contributes to getting the desired taper shape.
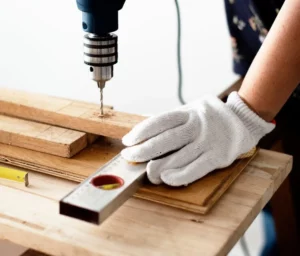
Safely Stable and Securing the Dowel
- Stability is Important: You must use a clamp tool for holding it tightly or a vice to stabilize the dowel firmly in the place where you want to adjust it. A stable dowel is a very important function for safe and effective tapering.
- Stop Movement: Eagerly ensure that the dowel is securely held and won’t move if anyone touches it during the tapering procedure. This saves us from big accidents and maintains consistency in the taper.
Step 4: Give Shaping the Taper
- Start Material Removal: Start the shaping taper by using an available different type of saw, for example, available saw as a hand saw, a coping saw, or a jigsaw. Start the project with a great angle and make the controlled cuts for shaping the taper.
- Maintain Execution: You must, again and again, practice caution and control with every gentle cut, mostly working towards using the intended taper for shape. If you do it yourself using all of these steps, with a steady hand and focus on stability is key to success.
Step 5: Using Sanding and Smoothing
- Switching to Sanding: After getting the rough shape taper, you will switch to sandpaper or a sanding block. Start with a coarser grit and progress to finer grits to get a smoother finish.
- Remove Wrong things: if you are using Sanding, it will remove the rough surfaces and imperfections things which are showing on it, ensuring a polished display and a comfortable feel.
- Dedicate Time: You must take more time during this step. Don’t do these steps fast you did all these steps very slowly and carefully, as the quality of your finished taper depends on thorough sanding and smoothing. If you want a professional, flawless result, you did it very carefully.
Other Methods for Tapering a Dowel Without a Lathe
When you start this project by tapering a dowel without a lathe, there are other methods available that provide you with flexibility and more precision in shaping. It’s very important to explore these different techniques, which provide you with different levels of control and may be better suited to projects.
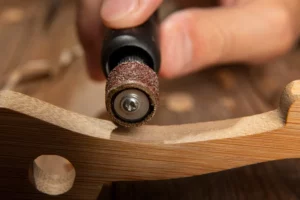
Using a Wood Rasp or File:
- A wood rasp, paper or file allows for making a smooth shaping of the taper by hand. This new easy method offers a large control over the taper’s dimensions and makes a great, smooth shape.
- It’s especially useful for making the project easy or when you want to smooth-tune the taper is more important.
- Begin with a coarse rasp or file and mostly move into finer ones to get a smooth finish project.
Using Different Chisels Easy Technique:
- Chisel tools can be used to display tapers controlled for the removal of material.
- This easy different method is very good for making the fine adjustments and gets a custom taper best angle.
- It’s very important to have good chiseling skills and maintain accuracy throughout this process.
Hand Plane Method:
- Hand planes, like block planes or bench planes, can be used to taper dowels by carefully planing away material.
- This method is effective for larger dowels where the plane’s surface can make consistent contact.
- Achieving the desired taper angle requires attention and accuracy.
Conclusion
Tapering a dowel without a lathe is a feasible DIY project with the right tools and techniques. By following this step-by-step guide, you can create tapered dowels tailored to your woodworking or DIY needs, adding a touch of craftsmanship to your projects.
FAQs
Q1: Can I taper dowels without specialized woodworking tools?
- Yes, you can use basic hand tools like a hand plane or sandpaper to achieve a tapered effect.
Q2: What type of wood is best for tapered dowels?
- Hardwoods like oak or maple are ideal for their stability and ease of shaping.
Q3: How do I prevent tear-outs while tapering?
- Ensuring sharp tools and using a controlled, gradual approach can minimize tear-outs.