A wooden wood lathe is a timeless machine that transforms raw timber into round balanced and often beautiful objects. The principle is simple. The machine spins the workpiece while the turner guides a tool to shape it. The results can be practical or artistic and often both at once. Pens bowls rolling pins tool handles balusters chair legs platters decorative finials and even musical instrument parts all flow from the same elegant process. Because the method emphasizes symmetry and smooth curves a wooden wood lathe sits at the heart of many workshops where precision and creativity meet.
This guide explains what a wooden lathe is how it works which woods perform best the advantages you gain from using one and how to set up use maintain and troubleshoot the machine. You will find clear steps for common projects safety guidance tool selection finishing options and real world mini case studies. The goal is a single resource that you can read today and use tomorrow at the lathe with confidence.
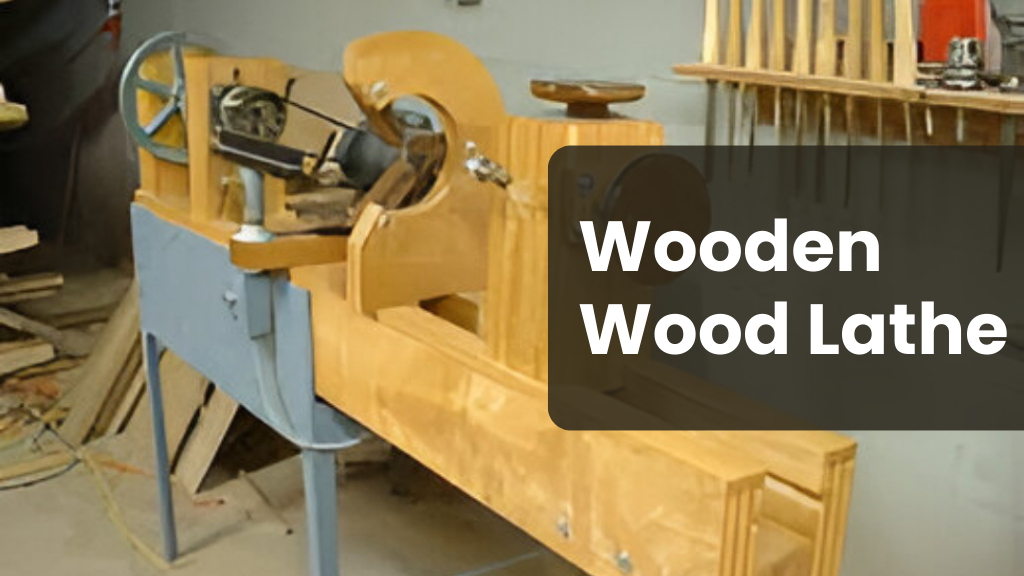
What is a Wooden Lathe
A wooden lathe is a woodworking machine that rotates a piece of wood at controlled speed while the operator presents a cutting tool to the spinning surface. The tool removes material in a controlled way and creates cylinders cones curves and complex profiles. The machine does not move the tool along a powered slide as a metalworking lathe does. Instead the turner rests the tool on a support and guides it by hand. This call and response between human and machine is a major reason woodturning feels lively and expressive.
1. Core assemblies
-
Headstock. Houses the spindle and usually the motor or a drive system. The spindle is the rotating shaft that accepts chucks centers and faceplates. Many spindles use a Morse taper for accessories and a common thread for chucks.
-
Tailstock. Slides along the bed to support the far end of the work. Inside the tailstock a quill advances using a hand wheel and holds a live center or a drill chuck.
-
Bed. A rigid beam that aligns the headstock and tailstock and supports the carriage known to turners as the banjo.
-
Tool rest and banjo. The banjo locks to the bed. The tool rest mounts on the banjo and provides a close support for chisels and gouges.
-
Motor and controls. A simple on and off switch plus speed control. Many modern machines use electronic variable speed which allows fine control of rotation per minute.
-
Safety features. A guard for the belt or pulleys a power switch in an easy to reach location and sometimes a spindle lock for safe accessory changes.
2. Two main turning orientations
-
Spindle turning. The grain runs along the length of the lathe. Think chair legs and rolling pins. The work is usually supported at both ends between centers.
-
Faceplate or bowl turning. The grain is perpendicular to the axis. The work often mounts to a faceplate or a chuck. One end is free so the interior or face of a bowl can be hollowed.
Why the Wooden Wood Lathe Still Matters Today
The wooden wood lathe remains relevant because it balances accuracy with artistry. A router or a table saw can produce repeatable cuts but not the fluid curves that a turner can define by hand. A lathe also allows custom work at a pace that is practical for small shops. When a client wants a set of balusters that match an antique pattern or a bowl with a specific diameter and profile there is no substitute for a competent turner at a reliable lathe. On the hobby side the machine offers a satisfying blend of quick wins and deep mastery. A first pen can be turned in an evening. A museum grade calabash bowl may take weeks. The same machine serves both goals.
A Short History of Woodturning
Woodturning stretches back many centuries. Early lathes used a cord wrapped around the workpiece and a bow to reciprocate the spin. Later treadle lathes allowed continuous rotation with a foot pedal and a flywheel. With the rise of industrial power sources wood lathes gained belts and pulleys that provided consistent speed. Today the modern lathe brings electronic speed control improved bearings accurate spindles and carefully cast beds for alignment and rigidity. Through all of these changes the essential method remains the same. Spin the wood. Touch steel to wood. Create a clean spiral of shavings and a controlled surface.
Anatomy in Detail
Understanding each part helps you troubleshoot problems and work with precision.
-
Headstock and spindle
The spindle has a nose that accepts chucks and faceplates and an internal taper that accepts a spur center or other fittings. Bearings hold the spindle true. If you feel vibration or heat around the headstock the bearings may need service. A spindle lock or indexing pin stops the spindle so you can remove or install accessories or mark divisions around a rim.
-
Tailstock and quill
The tailstock aligns with the headstock. You advance the quill with a hand wheel to bring a live center into the wood. For drilling you insert a drill chuck into the quill. Proper alignment reduces tapering and vibration. If alignment is off you can shim or adjust the tailstock depending on the model.
-
Banjo and tool rest
The tool rest should sit close to the work but not touch. You will reposition it often as the profile changes. A smooth rest helps tools glide. Keep the top of the rest polished and free of nicks. You can dress it with a fine file and some abrasive paper.
-
Drive systems
Older machines use stepped pulleys to change speed. You move the belt to a larger or smaller pulley groove. Newer machines use electronic speed control which lets you dial speed precisely. Low speed helps with rough blanks and out of balance work. High speed improves surface finish when the piece is balanced and round.
How a Wooden Wood Lathe Works Step by Step
The process follows a clear rhythm that you can adapt to any project.
-
Step one choose and prepare the blank
Select a species that fits the project. Cut the blank slightly oversized. If you turn a bowl mark the center on the face. If you turn a spindle mark the centers on both ends. Remove loose bark and any grit that could damage your tools.
-
Step two mount the blank
For spindle work seat a spur center in the headstock end and a live center in the tailstock end. For bowls screw a faceplate to the blank or grip it in a chuck with a strong tenon or a secure recess. Bring the tailstock up for extra support whenever possible.
-
Step three set the rest and check clearance
Place the tool rest slightly below the centerline for most tools. Rotate the blank by hand to confirm it clears the rest. Adjust your stance so your body can move smoothly along the path you expect to cut.
-
Step four start at low speed then increase as needed
Begin at a speed that feels calm and safe. As the piece rounds and the vibration falls you can increase speed to improve surface quality. Always let the workpiece and your comfort guide your speed choice.
-
Step five make controlled cuts
Use a roughing gouge to turn a square spindle into a cylinder. Use a bowl gouge to round a faceplate blank and to shape the exterior curve. Keep the bevel rubbing. Swing your body not just your arms. Present the tool edge gradually and listen for a clean slicing sound.
-
Step six refine the profile
Skew chisels create crisp details on spindles. Scrapers can refine interior curves. Calipers help you maintain even wall thickness. Stop and inspect often. Fresh eyes catch flat spots and uneven curves.
-
Step seven sand with the lathe running
Move through grits methodically. Wipe dust between grits so you do not drag coarse particles forward. Keep the piece spinning but slow enough to avoid heat. Always back the sandpaper with your fingers or a firm pad and keep moving to reduce friction.
-
Step eight apply finish
Choose a finish that fits the use case. A salad bowl needs a food safe oil. A decorative vase may benefit from shellac followed by wax for a warm sheen. Pens and handles often use hard film finishes for durability.
Step nine remove the piece and complete any off lathe steps
Part the work free with a parting tool or saw. Trim nubs or tenons and hand sand the spots that were hidden by centers or chucks. Apply the final coat of finish and buff to the sheen you want.
What is the Best Wood for a Wood Lathe
Different woods behave differently under the tool. Grain structure hardness and moisture content all matter.
1. Friendly choices for beginners
- Cherry. Cuts cleanly holds detail and ages to a warm color. It sands easily and accepts a range of finishes.
- Maple. Predictable strong and smooth. Hard maple is durable for handles and cutting boards while soft maple is easier to cut for bowls and platters.
- Birch. Even grain and cooperative cutting action. Good for learning tool control.
- Poplar. Soft and forgiving for practice although it dents easily.
2. Popular hardwoods for intermediate and advanced work
- Walnut. Rich color and pleasant aroma. The grain turns cleanly and looks elegant with an oil finish.
- Ash. Strong open grain that shows striking patterns on larger bowls and tool handles.
- Oak. Bold grain and strength. Open pores need careful sanding and finishing for a smooth result.
- Beech. Fine grain and stability. Often used for tool handles and rolling pins.
- Sycamore and plane tree. Attractive fleck patterns and good turning behavior.
3. Special woods and figure
- Curly maple and curly ash show shimmering figure that rewards careful tool control. Shear scraping and sharp edges help reduce tearout.
- Fruitwoods such as apple pear and plum cut cleanly and take a superb polish.
- Exotic species like padauk bubinga or purpleheart offer strong color and density. They require sharp tools and sometimes slower cutting to avoid heat.
4. Green wood versus seasoned wood
Green wood means freshly cut with higher moisture content. It cuts easily and creates long flowing shavings. Bowls turned from green wood will often warp as they dry which can be part of the design. Seasoned or kiln dried wood is stable and better for parts that must hold exact dimensions such as threaded lids or matched spindles.
5. Choosing blanks for safety
Avoid cracks checks and knots that run to the edge. For bowls look for a blank with growth rings that are even across the core. For spindles follow the straightest grain you can find. Remove grit and stones trapped in bark since they ruin sharp edges in an instant.
What are the Advantages of a Wooden Wood Lathe
A wooden wood lathe delivers value to hobbyists and professionals.
- Versatility across projects. One machine supports pens bowls platters furniture parts ornaments and tool handles.
- Speed from idea to object. Once the blank is prepared the process moves quickly and you can complete many pieces in the same day.
- Precision with personality. Profiles and diameters can be measured to the fraction of a millimeter while the hand cut surfaces still show the life of the tool.
- Compact footprint. Bench top and midi machines fit in small shops and garages yet handle serious work.
- Therapeutic routine. The rhythm of the machine and the clean arc of a good cut offer a satisfying practice that many turners describe as meditative.
- Efficient material use. Offcuts from other projects become handles knobs and small gifts rather than waste.
- Repair and restoration. When a stair baluster breaks or an antique chair needs a new spindle the lathe allows perfect matches.
Essential Turning Tools and Accessories
A tool kit grows over time. Start simple then add specialized tools as projects demand.
1. Cutting tools
- Spindle roughing gouge. Quickly rounds square stock. Use only for spindle work.
- Bowl gouge. The main shaping tool for bowls and platters. Available in various flute shapes. A deep flute with a swept back grind offers versatility.
- Spindle gouge. Ideal for beads coves and delicate details.
- Skew chisel. Produces the smoothest finish on spindles and crisp planing cuts when mastered.
- Parting tool. Separates work and sets precise diameters.
- Scrapers. Useful for refining interior curves and smoothing problem grain. Use a gentle touch to avoid heat and tearout.
- Hollowing tools. Reach deep inside narrow openings for vases and hollow forms. Some have articulated arms for control.
2. Work holding
- Spur center. Drives spindle work from the headstock.
- Live center. Supports the tailstock end with bearings so it spins freely.
- Scroll chuck with dovetail jaws. Grips a tenon or expands in a recess and allows quick remounting.
- Faceplate. Screws directly to the blank for secure roughing especially on large bowls.
- Steady rest. Support for long slender spindles to reduce vibration.
3. Measuring and layout
- Calipers. Check wall thickness and diameters.
- Dividers. Repeat spacing for beads and flutes.
- Templates. Cardboard or plywood profiles ensure consistent shapes on sets of parts.
4. Sharpening
Sharp tools are non negotiable. A grinder with a consistent tool rest or a jig creates reliable bevels. High speed steel is common and holds an edge well. Carbide insert tools offer convenience for beginners because you rotate or replace the cutter instead of grinding. Learn to sharpen early since a sharp edge is safer and leaves a better finish.
Safety Fundamentals Everyone Should Follow
Safety is an active habit. Follow these rules every time.
- Wear eye protection and a face shield for bowl turning where chips can fly.
- Do not wear loose clothing scarves or jewelry. Tie back long hair.
- Check that the work is secure and clears the rest. Hand rotate before starting.
- Stand out of the line of fire when you first power up a new blank.
- Start at a slow speed and increase only when the blank is balanced.
- Keep tools sharp and your stance stable. Let the bevel guide the cut.
- Keep the shop clean. Wood dust can be harmful. Use dust collection and a mask during sanding.
- Never leave the machine running unattended. Turn it off before measuring or adjusting the rest.
Setup and Calibration for Accurate Results
A precise machine makes the work easier and safer.
-
Placement and leveling
Place the lathe on a firm floor. Level the bed across its length. A small wedge under a foot can remove twist. Reducing vibration improves cut quality.
-
Tailstock alignment
Bring a live center into contact with a spur center in the headstock. The points should meet. If they do not your tailstock may need adjustment or shimming. Good alignment prevents tapered parts when turning between centers.
-
Tool rest height and angle
Set the rest to place the cutting edge near the centerline. For a bowl gouge the rest often sits a little below center to let the bevel rub. Keep the rest close to the work. Move it often and lock it firmly.
-
Speed selection
As a guideline larger diameters and out of balance blanks need slower speeds. As the piece rounds and balances you can increase speed to improve surface quality. Your comfort is part of the equation. If the work feels unsettling slow it down.
Speeds and Feeds in Practical Terms
Rather than memorize a formula use these practical cues.
- The sound of the cut should be steady. A chattering sound means too much vibration or too aggressive a cut.
- Shavings should be continuous ribbons when slicing with a sharp edge. Dust means the edge is dull or the presentation is scraping rather than cutting.
- When sanding keep the speed moderate. Heat creates checks and clogs the abrasive.
Tool Technique Fundamentals
Mastering basic tool techniques is essential for safe, clean, and precise cuts. Proper support, movement, and awareness of grain direction help woodworkers maintain control and achieve professional results.
-
Bevel support
Nearly all clean cuts begin with the bevel touching the wood. Roll the tool to present the edge only after the bevel is supported. This stabilizes the cut and reduces catches.
-
Body movement
Keep your elbows near your body and move from the legs and hips. This maintains a consistent tool path. The hands aim the cut while the body powers the sweep.
-
Entry and exit
Enter with care and exit with the bevel still engaged. Lifting the handle too early often causes a dig in or a torn edge. Plan your cuts so you always have a safe exit path.
-
Grain direction
On spindles cut from large diameter toward small diameter. On bowls cut from rim toward base on the outside and from the center toward the rim on the inside. Working downhill with the grain reduces tearout.
Finishing Options and How to Choose
A finish protects the wood and sets the tone of the piece.
- Oil finishes such as walnut or mineral oil penetrate and create a warm natural look. Easy to refresh. Good for kitchenware when food safe products are used.
- Shellac builds quickly and can be buffed to a soft gloss. It dries fast and enhances figure.
- Lacquer and varnish create tougher films that resist wear and moisture. Good for pens and daily use items.
- Wax over oil or shellac adds a soft sheen and pleasing feel. It is not a primary protective layer for heavy use but lovely on decorative work.
- Stains and dyes shift the color. Use on woods with plain grain when you want more drama.
Apply thin coats. Sand lightly between coats where appropriate. Let each coat cure as directed by the product label. For bowls and food contact items allow extra curing time before use.
Maintenance and Care for Long Service
A lathe rewards regular care.
- Clean after each session. Brush chips off the bed and wipe metal with a light oil to prevent rust.
- Inspect belts pulleys and set screws. Replace worn belts. Tighten loose fasteners.
- Check headstock and tailstock alignment and adjust if needed.
- Lubricate moving parts according to the manual. Do not over oil since excess attracts dust.
- Keep tools sharp. Store gouges and chisels so edges are protected.
- Maintain chucks. Disassemble and clean the jaws. Lightly oil the scroll mechanism.
- Protect wooden handles of tools with oil or varnish so they remain smooth and strong.
Conclusion
The wooden wood lathe remains one of the most capable and satisfying machines in the craft shop. It blends engineering and hand skill. It can produce exact replacements for architectural parts and it can also deliver one of a kind art pieces that show the character of the tree and the maker. With a thoughtful setup a sharp tool and respect for safety you can turn out clean profiles in a matter of minutes and heirloom objects in a matter of hours.
Begin with sound wood and a realistic project. Practice beads coves and planing cuts before you chase complex shapes. Keep tools sharp and let the bevel lead the way. As your confidence grows explore bowls hollow forms natural edge pieces and segmented blanks. Maintain your machine so it remains quiet and accurate. Share your results with friends and clients and listen to feedback. The path from rough blank to finished form is a conversation with the material and with your own sense of design.
Frequently Asked Questions
What is a wooden wood lathe
A wooden wood lathe is a machine that spins a piece of wood while the turner guides a cutting tool against it to create round or curved forms. It is central to woodturning for items such as bowls spindles pens handles and many other objects.
What is the process of a wooden wood lathe
The process begins with selecting and preparing a blank then mounting it on the machine. The turner sets a safe speed and rests the tool on the support. With the bevel in contact the tool engages the spinning wood to shape the form. After shaping the piece is sanded while spinning and then finished with an appropriate product. Finally the work is removed and any remaining nubs are cleaned by hand.
What is the best wood for a wood lathe
For most beginners cherry and maple provide a cooperative balance of ease and strength. Walnut ash and beech are popular for intermediate work. Green wood is friendly for bowls and creates lively shapes as it dries. Avoid cracked or knotty blanks until you have more experience.
What are the advantages of a wooden wood lathe
It offers versatility speed and precision with a personal touch. A single machine supports many project types. It fits small shops and responds to a turner’s skill in a way that other machines do not. It is also a rewarding craft that turns offcuts into useful or beautiful pieces.
How large a lathe do I need
Choose based on the largest diameter and length you plan to turn. A bench top or midi machine handles pens small bowls and furniture parts. Large bowls and long porch columns require a full size machine with greater swing and power.