If you love crafting with wood, a woodworking biscuit joiner deserves a place among your essential tools. It helps you join two pieces of wood perfectly flush, whether you are creating a tabletop, cabinet panel, or picture frame. Biscuit joiners are designed for speed, precision, and alignment. They are easy to handle once you understand the correct technique and become a valuable addition for any hobbyist or professional.
This detailed guide explains how biscuit joiners work, how to use them effectively, and what mistakes to avoid. You will also find advanced tips that even experienced woodworkers use to achieve seamless, durable joints.
Key Takeaways
- A woodworking biscuit joiner helps you create clean, hidden, and strong joints in panels and frames.
- It provides accurate alignment and additional strength when edge joining, making it ideal for cabinetry and furniture work.
- Proper setup, biscuit size selection, and correct gluing technique determine how successful the joint will be.
- Using the right clamp pressure, reference faces, and alignment markings helps ensure professional results.
- Biscuit joinery saves time, reduces sanding, and guarantees flush surfaces for finishing.
What Is a Biscuit Joiner?
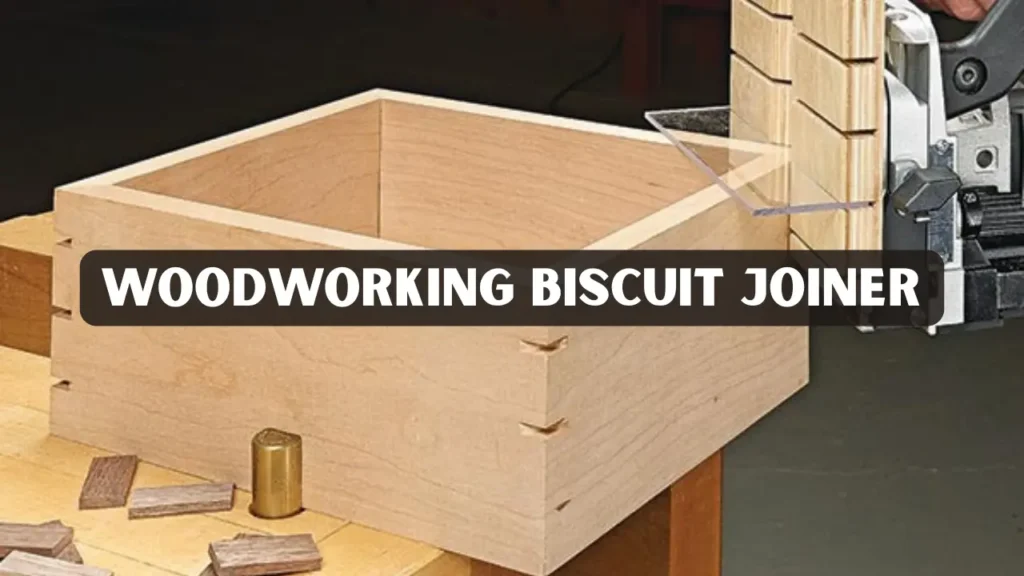
A biscuit joiner, also known as a plate joiner, is a woodworking tool that cuts oval-shaped slots in two adjoining pieces of wood. Thin, oval biscuits made of compressed beech wood fit into these slots with glue. As the glue dries, the biscuits swell slightly, locking the boards tightly together.
The main benefits include:
- Perfect alignment between edges.
- Extra gluing surface for stronger bonds.
- Speed and repeatability for batch production.
Common biscuit sizes are #0 (small), #10 (medium), and #20 (large). The tool’s versatility makes it useful for both furniture building and general woodworking projects.
When to Use a Biscuit Joiner
Use a biscuit joiner when you need consistent alignment and moderate reinforcement in your projects. It is most effective for:
- Edge joining boards for tabletops or wide panels.
- Cabinet face frames where alignment and flush edges are crucial.
- Mitered corners such as picture frames or decorative boxes.
- Shelf and carcass alignment during cabinet assembly.
While strong, biscuits are not a substitute for structural joints such as mortise and tenon or dowels in heavy-load situations. Instead, think of them as alignment aids with moderate reinforcement.
Tools and Materials You Need
- Biscuit joiner (corded or cordless)
- Biscuit assortment (#0, #10, #20)
- Pencil, square, or marking gauge
- PVA wood glue
- Clamps or pipe clamps
- Safety glasses and ear protection
- Sandpaper and finishing materials
Expert Tip: Keep biscuits sealed in airtight containers. Exposure to moisture causes them to swell before use, making them unusable.
Step-by-Step: How to Use a Woodworking Biscuit Joiner
Mark the joint locations
Align the pieces and draw reference lines every 6–12 inches. Make sure both boards share the same reference face to prevent misalignment later.
Set the fence and depth
Adjust the joiner’s fence angle to 90 degrees for standard edge joints. Select the correct depth based on biscuit size (#0, #10, or #20).
Cut the slots
Align the joiner’s center mark with your pencil line. Turn on the motor and make a controlled plunge into the wood. Repeat for the matching piece.
Dry-fit the joint
Insert biscuits without glue and check alignment. The pieces should fit snugly and remain flush.
Apply glue and assemble
Spread glue in each slot and on both mating surfaces. Insert biscuits, align the boards, and clamp them together evenly.
Clamp and let cure
Use moderate clamp pressure until the glue sets. Over-clamping may squeeze out glue and weaken the joint.
Clean and finish
Wipe away glue squeeze-out with a damp cloth. After the glue dries, sand the surface smooth and prepare for finish.
This method ensures consistent, strong, and invisible joints every time.
Selecting the Right Biscuit and Glue
Biscuit size depends on the thickness of the boards being joined:
- #0 biscuits: for thin or narrow boards and trims.
- #10 biscuits: general-purpose for most furniture projects.
- #20 biscuits: ideal for wide boards and tabletops.
Glue Selection:
- Use PVA (yellow or white wood glue) for most applications.
- For outdoor projects, use waterproof polyurethane or exterior-grade adhesive.
Tip: Match biscuit size to material thickness and keep your cuts centered for consistent strength.
Alignment, Accuracy and Avoiding Common Mistakes
Accuracy is the heart of biscuit joinery. The following tips help eliminate common problems:
- Use the same reference face on both boards.
- Keep biscuit spacing between 6 and 12 inches for uniform alignment.
- Don’t push too hard when plunging the blade; let it cut smoothly.
- Avoid over-clamping, which can squeeze out too much glue.
- Test on scrap pieces before working on your actual project.
A simple alignment checklist:
- Check the tool fence for square.
- Mark consistent biscuit locations.
- Dry-fit before gluing.
- Use even clamp pressure.
Real-World Example of Biscuit Joinery Success
A small custom furniture shop in Rawalpindi recently upgraded its workflow by introducing a woodworking biscuit joiner for face-frame cabinet assembly. Before the switch, the team used pocket screws, which often required filler and extra sanding. By integrating biscuit joinery, the shop reduced sanding time by half and achieved perfect edge alignment on every frame.
According to the shop owner, biscuits offered a cleaner aesthetic and easier clamping because the joints self-aligned during glue-up. The team’s efficiency improved significantly, allowing more time for finishing and detailing.
This real example demonstrates that biscuit joiners enhance both accuracy and productivity, especially in small workshops.
Advanced Tips and Tricks for Perfect Results
- Maintain a sharp blade to prevent burning and rough slot edges.
- Plunge smoothly and confidently to keep cuts consistent.
- Label each board and slot to prevent mismatched pieces.
- Avoid edge blowout by supporting thin workpieces with scrap backing.
- Combine biscuits with dowels or splines for additional strength in heavy projects.
When precision is critical, a biscuit joiner combined with careful measurement provides seamless joints without the need for complex jigs.
Safety Guidelines
- Always wear eye protection and hearing guards.
- Wait for the blade to stop spinning before setting the tool down.
- Keep hands away from the blade path.
- Inspect the joiner regularly for dust buildup or worn components.
- Unplug the tool when changing blades or adjusting the fence.
Practicing proper safety ensures consistent results and extends your tool’s lifespan.
Biscuit Joiner vs. Other Joinery Methods
-
Biscuit Joint:
-
Strength: Moderate
-
Speed: Fast
-
Appearance: Hidden
-
Best For: Panel alignment and cabinet face frames
-
-
Dowel Joint:
-
Strength: High
-
Speed: Moderate
-
Appearance: Hidden
-
Best For: Load-bearing frame or furniture joints
-
-
Pocket Screw Joint:
-
Strength: Very High
-
Speed: Very Fast
-
Appearance: Visible (unless plugged)
-
Best For: Quick assembly or temporary joinery tasks
-
-
Mortise and Tenon Joint:
-
Strength: Maximum
-
Speed: Slow
-
Appearance: Hidden
-
Best For: Traditional woodworking and high-strength structural projects
-
A biscuit joiner offers the perfect balance between strength and speed for general woodworking tasks. It saves time without sacrificing appearance or alignment accuracy.
Expert Insight: Combining Techniques
Many professionals pair biscuits with other joinery methods. For instance:
- Use biscuits plus pocket screws for carcass assembly to achieve alignment and strength.
- Add biscuits to miter joints for alignment during glue-up.
- Pair biscuits with edge banding to ensure seamless veneer application.
This hybrid approach leverages the precision of a biscuit joiner while reinforcing joints that need extra durability.
Maintenance and Storage Tips
Maintaining your biscuit joiner ensures longevity and accuracy:
- Clean the blade and dust port after every use.
- Store biscuits in airtight containers.
- Lubricate moving parts lightly to prevent corrosion.
- Check calibration regularly to ensure consistent depth cuts.
A well-maintained woodworking biscuit joiner performs with higher accuracy, smoother plunges, and longer lifespan.
Conclusion
The woodworking biscuit joiner is a powerful tool for creating clean, hidden joints that make your projects look professional and refined. By mastering marking, slot cutting, glue application, and clamping, you can achieve precise and durable connections every time.
From edge joining and panel alignment to quick cabinet assembly, biscuit joiners simplify tasks that once required complex setups. Combine this tool with accurate measuring habits and regular maintenance, and you will unlock new levels of craftsmanship in your workshop.
If you are ready to elevate your woodworking skills, start practicing biscuit joinery on small test projects. The experience you gain will transform how you approach larger builds and help you produce cleaner, faster, and more accurate results on every piece you create.
Frequently Asked Questions
How deep should the slots be?
The depth depends on the biscuit size. Each joiner includes preset settings for #0, #10, and #20 biscuits. The goal is to center the slot on the board’s thickness.
Can I use a biscuit joiner on plywood?
Yes. Use the correct depth setting and avoid cutting too close to the edge to prevent tear-out. Always test on scrap plywood before making final cuts.
Are biscuits strong enough for tabletops?
Biscuits primarily offer alignment, not structural strength. For tabletops, use biscuits every 6–8 inches combined with clamps and a solid adhesive for long-term stability.
What glue works best?
PVA wood glue is suitable for most interior applications. For outdoor furniture, use waterproof adhesives.
Can I use biscuits on end grain?
End-grain joints are weaker because they absorb glue. It’s better to use dowels, mortise-and-tenon, or splines for end-grain connections.